Direct to Film (DTF) printing is a cutting-edge method of printing bright graphics on a variety of surfaces. The field of printing technology has advanced throughout the years. In this state-of-the-art method, setting up the digital artwork is crucial to getting the best results. This tutorial explores the complexities of preparing artwork for DTF printing, including subtle modifications, color separations, and file format issues. Artists and printers can maximize DTF technology’s clarity, detail, and color brightness by mastering these factors.

Artwork Preparation: Crafting the Canvas for DTF Brilliance
Starting a DTF printing business involves not just technical skill but also a sharp eye for exacting artwork preparation. The digital canvas serves as a medium through which the artist’s idea is translated into a genuine, lively world, rather than just a surface for design. The finer points of artwork preparation for DTF printing become clear as we dive into them; it’s a careful tango between accuracy and creativity.
File Format and Resolution Requirements
Selecting the Correct Format: The first step in this creative process is to choose the right file format. PNG and TIFF are lossless formats that work well for DTF printing because they maintain the integrity of each pixel and guarantee an accurate reproduction of fine details.

Resolution: A DTF artist needs a sufficiently high resolution, just as a painter needs a high-quality canvas. It’s important to strike a balance between file size and clarity; too high a resolution might impede the printing process, while too low a resolution loses information.
Color Mode Considerations
RGB vs. CMYK: Selecting between RGB and CMYK affects the final output’s vibrancy and is not only a technical decision. RGB is often used because of its wider color spectrum, particularly for designs with plenty of color variety.
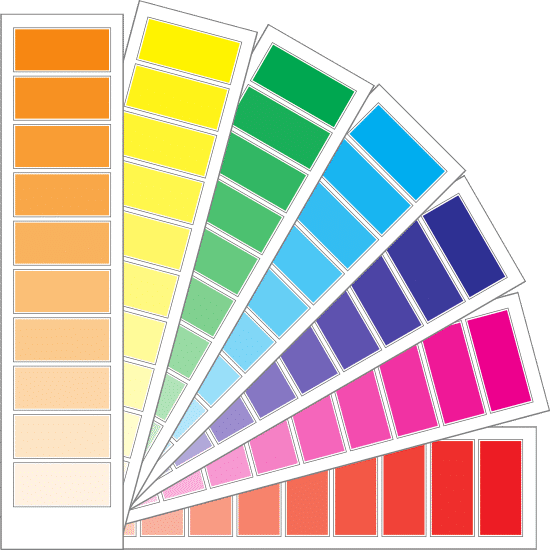
Color Profile Settings: All artwork has to move in unison with a unified color profile. Making the correct color profile choice guarantees that the artist’s color vision is accurately represented in the DTF print.
Artboard Size and Placement
Matching Artboard Size: The artboard, akin to a traditional canvas, dictates the spatial boundaries of creativity. To avoid unintentional cropping or distortion, it is crucial to align the artboard size with the desired print proportions.
Positioning on the Film: Take into account where the design is placed on the film, much like a director framing a scene. The printed design will appear exactly as intended thanks to centering, alignment, and proportionate distribution.
As the artist carefully considers these factors, the canvas’s digital brushstrokes change. This stage is not only a necessary technical necessity, but also a crucial section where creativity and printing process practicality collide. This is the point at which the abstract becomes a concrete work of art, laying the groundwork for color separation and the subtle dance of colors, the next chapter in the DTF printing story.
Detail Enhancement
The focus now shifts to detail improvement as we enter the fascinating world of DTF printing—a phase when the digital canvas becomes a tapestry of intricate details. The process of improving a detail elevates a design from the ordinary to the remarkable, much as a craftsman painstakingly creates small details.
Fine-Tuning Intricate Details for Better Print Results
The Canvas as a Mosaic: The mosaic pieces that together tell the story of the design are called details. Like a small brushstroke, every pixel adds to the visual narrative. Get close up, examine closely, and take in the details that give the piece of art its life.
Discovering Hidden jewels: One way to improve a design is to find hidden jewels. Discover the nuances that the untrained eye would miss, transforming every detail into an eye-catching surprise that draws the viewer in.
B. Making Use of the Right Tools to Enhance Details
Sharpening Techniques: Sharpening is the artist’s touch: a deft adjustment that enhances clarity without compromising the design’s organic character. Investigate methods and instruments for sharpening edges and defining details to ensure a clean, polished look.
Highlighting and Shadow Adjustments: Adjusting the shadows and highlights on a digital canvas creates the chiaroscuro effect. Expert modifications highlight the way light and dark interact, creating a subtle effect that gives the design more depth and character.
C. Iterative Exploration: Refinement as a Creative Journey
The Iterative Process: Detail enhancement is not a one-time endeavor; it’s a journey of exploration and refinement. Experiment, iterate, and let the design develop naturally. Accept the creative process and remember that every change deepens the story.
Balance and Subtlety: Strike a balance between subtlety and augmentation, just like a great storyteller. The right amount of detail should entice the observer to look closer and pick up subtleties with every glance, rather than taking over.
Creating the Ideal Canvas in Photoshop
Getting over Photoshop’s complexities for DTF printing is a methodical process that is like to arranging a digital arts symphony. Let’s explore the specifics of the procedure, figuring out the subtleties that provide a smooth transition from the conception of the design to the production of a canvas that is prepared to experience the magic of DTF printing.
1. Open Photoshop and Your Design:
Open the gateway to your creative realm by launching Photoshop. With your design at the ready, the digital canvas awaits the infusion of your artistic vision.
2. Ensure a Transparent Background:
Transparency is the key to the alchemy of DTF printing. Confirm that your design boasts a transparent background, allowing for a pristine transfer onto the final substrate.
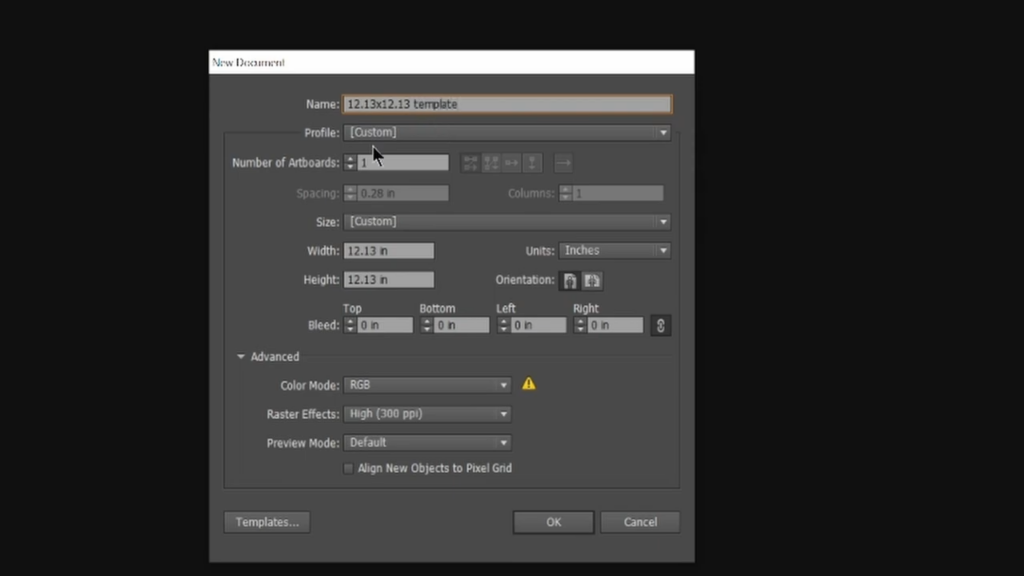
3. Create a New Document:
The canvas beckons, and to heed its call, navigate to “File” and then “New” in the Photoshop menu. A new document emerges, a blank slate awaiting the strokes of creativity.
4. Background Removal (if necessary):
If your design lacks the ethereal touch of a transparent background, this is the moment to remedy it. Remove the background, allowing your creation to exist unencumbered.
5. Set Document Parameters:
The heartbeat of your canvas lies in its parameters. Set the stage by ensuring the following:
- Orientation: Vertical/Portrait
- Units: Inches (not pixels)
- Width: 22 Inches
- Length: Aligned with specifications from our website (consult the Length Chart)
- Resolution: 300 pixels per inch (DPI)
- Color Mode: RGB
- Background Contents: Transparent
- Color Profile: sRGB IEC61966-2.1
6. Hit “Create”:
With the parameters aligned, breathe life into your canvas by hitting the “Create” button. A digital expanse now awaits the infusion of your artistic narrative.
7. Drag Your Design Onto the Transparent Background:
Your design takes center stage. Drag it onto the transparent canvas, allowing the synergy between creativity and technology to unfold.
8. Copy and Paste Artwork:
Expand your artistic vision across the digital expanse. Copy and paste your artwork, cultivating a tapestry that fills the canvas with your creative essence.

9. Save a Copy:
Preservation is paramount. Navigate to “File” and choose “Save a Copy” to safeguard your masterpiece.
10. Choose PNG Format:
The language of DTF printing appreciates the nuances of PNG. In the “Save as Type” dropdown, select “PNG” to encapsulate the vibrancy and transparency of your design.
11. Click “Save”:
Seal the pact with creativity by clicking “Save.” Your design is now encoded in a format poised for the transformative journey onto the DTF film.
Every action in this orchestra of Photoshop tricks adds to the canvas’s harmonic preparation. The end product is more than just a digital file – it’s a vessel prepared to receive the magic of DTF printing and transfer the spirit of your imagination into a material surface. Testing and calibration become the decisive factor as we go into the next act, making sure the digital masterpiece transfers flawlessly from the virtual world to the concrete wonder of DTF printing.
Conclusion
So, now you learnt how to set up art for the best DTF print. From careful planning to fine-tuning minutiae, our journey in the world of DTF printing results in a symphony of imagination and accuracy. As the curtain falls, the culmination is not just printed designs but a manifestation of ingenuity. The DTF technique creates vivid realities by fusing technology and art, leaving a lasting impression on the material platforms of artistic expression.
FAQs
DTF, or Direct to Film printing, is a revolutionary technique that involves transferring designs directly onto a film, which serves as an intermediary layer between the printer and the final substrate. Unlike traditional methods, this process enables vibrant and intricate designs on various surfaces.
Transparency ensures a seamless transfer of designs onto substrates. DTF printing relies on precise color application, and a transparent background allows the printer to accurately replicate the intended design without any unwanted elements.
Ensure a vertical orientation, inches as the unit (not pixels), a width of 22 inches, length as specified by our website’s Length Chart, 300 pixels per inch resolution (DPI), RGB color mode, transparent background, and sRGB IEC61966-2.1 color profile.
Color separation involves breaking down a design into its elemental color components, allowing for precise printing and vibrant reproduction. This meticulous process ensures each color is accurately represented on the final substrate.
Detail enhancement involves using Photoshop tools to refine and highlight intricate elements. Techniques such as sharpening, adjusting highlights and shadows, and iterative refinement contribute to creating a visually stunning and detailed design.
Calibration ensures that the printer, software, and DTF film work in harmony, preventing issues like misalignment, color inaccuracies, or ink adhesion problems. Regular calibration guarantees optimal print quality and consistency.
PNG format preserves transparency and high-quality details, making it an ideal choice for DTF printing. It encapsulates the essence of the design, ensuring a crisp, vibrant, and faithful reproduction on the final substrate.
Yes, DTF printing accommodates a variety of substrates, including dark ones. Effective color separation and adjustments are crucial to accentuate contrasts and ensure that vibrant colors pop against dark backgrounds.
DTF printing transforms digital visions into tangible masterpieces, bridging the gap between artistic creativity and technological precision. It allows artists to bring their intricate designs to life with vibrant colors and meticulous details on a variety of surfaces.
When choosing DTF film, consider factors such as transparency, clarity, and compatibility with your printer and inks. The right film contributes to the overall success of the DTF printing process by ensuring accurate ink adhesion and vibrant color reproduction.

Ashley Wang is a skilled sales manager with knowledge in DTF printing. She presently works for ShenLan Digital, a reputable DTF printer maker. Ashley is the best person to offer advice on selecting the most suitable DTF printer because she has tested a lot of them. She launched DTFPrinterSchool to educate individuals and organizations about DTF printing technology, providing her expertise and observations on the most recent advancements in the sector. Ashley is an invaluable resource for businesses and individuals wishing to invest in DTF printing technology because of her expertise and experience in the industry.