Welcome to the dynamic world of DTF printing, where accuracy and creativity coexist. The emergence of white or grey spots after ink curing is a typical obstacle in the pursuit of perfect prints. These invisible flaws have the potential to detract from your ideas’ genius. We explore the complexities of this problem in this tutorial, identifying its root causes and offering practical solutions. Join us as we troubleshoot and prevent to make your DTF prints sparkle. Learn how to overcome white/grey spots to improve your printing game.

Our Experience with White Spots in DTF Prints After Curing Ink
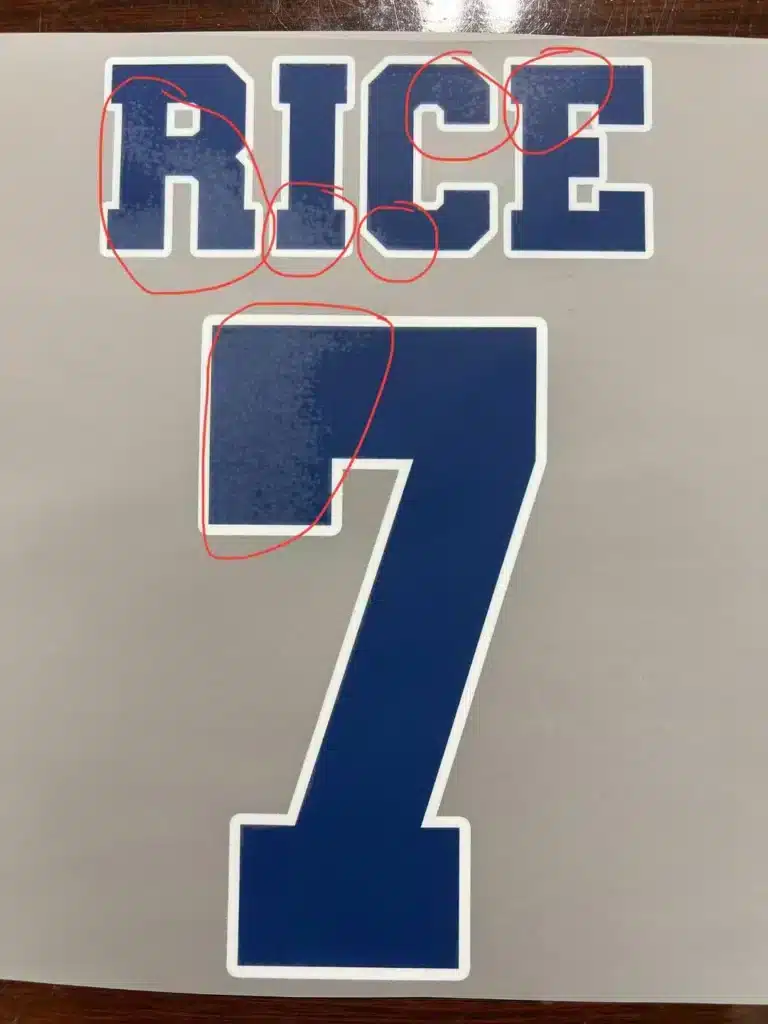
Yes, the annoying dance with white/grey dots is something I’ve encountered while printing DTF designs. We’ve all too often struggled with wasting films, ink, and garments. Imagine this: a few flawless prints, then suddenly, the unwelcome appearance of those pesky spots.
I understand your agony, and I have treated prints with stains, red sweatshirts with uneven graphics, and films that seemed flawless until pressed on a gray hoodie. It’s a puzzle, but let me break down my process for you:
- Brother GTX Pro: My go-to for printing films.
- Shaker bottle: I mix powder into ink, and yes, I repurpose extra powder. wondering if that’s the one at fault.
- Shaking the film: Is it possible that my excitement was causing the powder to separate from the ink?
- Curing using a heat press: 290 degrees for 180 seconds, 380 degrees for 180 seconds, and other values were tried. Still, those spots persist.
- Garment press: 320 degrees for 15 seconds – the final touch before the agonizing wait and peel.
Come along with me as we troubleshoot and discover the magic combination to free our prints from the grip of white or grey flaws. Let’s work together to overcome this obstacle and succeed in the DTF printing industry.
The Solutions [Working]
- Moisture Management: Assurance of Powder Quality: Pay close attention to the quality of your powder. A poor batch might cause clumps and dampness that could ruin your prints. Purchase a dependable, superior powder supplier to take away this concern.
- Pre-pressing Your Garments: Make sure your clothes are sufficiently pre-pressed. Fabric moisture can lead to issues for the printing process. Give your clothes as much time as they need in the heat to get rid of any remaining moisture.
- Curing Precision: Moisture-related problems can arise from irregular curing conditions. Keep an eye on the temperature and curing period, particularly if the prints are left overnight. The ideal curing process guarantees a perfect, moisture-free finish.
Proximity Matters:
Prevent Overheating: When handling heat, keep a safe distance from the film. If you go too near, you face into the risk of overheating and boiling and unintentional evaporation. It’s important to be patient and let the water and glycol evaporate at temperatures lower than boiling.
Controlling Humidity: To keep things at their best, get a digital humidity gauge. Maintain appropriate humidity levels, preferably between 40% and 60%. This little but important gadget might be your partner in the fight against problems caused by dampness. To avoid outside moisture affecting your prints, keep in mind that a closed atmosphere is your greatest friend while printing.
Taking Care of Oily Substances
The specifics of the cure period are crucial. I too had the problem of an oily material accumulating under my prints as a result of inadequate curing. My recommendation? extending the curing period to 150 seconds, which is a sweet spot.
This length of time efficiently eliminates any space for moisture to remain after the glycol evaporates. I started turning the print for an extra 150 seconds just to be cautious. This protects against any potential uneven heat areas and guarantees consistent curing.
Dehumidifier Addition
It’s a good idea to add a dehumidifier to your printing area, particularly if there’s a chance of excessive humidity. This additional layer of defense works in harmony with the longer curing period to produce immaculate prints.
Remember, precision in humidity and curing time can be the game-changer in banishing those watermark-like spots and elevating your DTF printing to a new level of excellence.
I have effectively overcome the difficulties posed by white/grey spots in DTF printing by putting these methodical techniques into practice, and I consistently produce excellent results.
| Image | Product | Features | Price |
|---|---|---|---|
EDITOR’S CHOICE  | SIMSEN 95oz 720 sq ft Quiet Dehumidifier
| 9.8 | Check on Amazon |
AMAZON’S CHOICE  | Vellgoo 4,500 Sq.Ft Energy Star Dehumidifier
| 9.6 | Check on Amazon |
BEST VALUE  | RUWORA 2500 Sq.Ft 30 Pint Dehumidifier
| 9.4 | Check on Amazon |
BUDGET PICK  | NineSky Dehumidifier 85 OZ Water Tank 800 sq.ft
| 9.3 | Check on Amazon |
BEST ALTERNATIVE  | Midea 4,500 Sq. Ft. Dehumidifier
| 9 | Check on Amazon |
Conclusion
Tight attention to detail is essential to solving the mystery of white/grey spots in DTF printing. Every stage counts toward a perfect result, from perfecting powder quality to prolonging curing time, controlling humidity, and using dehumidifiers.
Eliminate print defects with digital gauges and accuracy. Your DTF prints deserve the perfection attained through these solutions. Enjoy the craftsmanship of spotless perfection, appreciate the complexities, and strengthen your skill. Cheers to your journey towards impeccable DTF printing!
FAQs
These spots are often attributed to moisture-related issues, including poor powder quality, insufficient curing time, and uncontrolled humidity.
Invest in a digital humidity gauge to maintain levels between 40% and 60%. Keep your workspace closed during printing to avoid external moisture interference.
Insufficient curing time can result in an oily substance beneath prints. Extending the curing duration, around 150 seconds, ensures effective evaporation of glycol and eliminates wet spots.
Flipping the print for an additional 150 seconds helps ensure consistent curing and safeguards against potential inconsistent heat spots, contributing to a flawless outcome.
Introducing a dehumidifier is recommended, especially in environments prone to high humidity. It complements extended curing time, fostering an ideal setting for pristine DTF prints.
Reusing excess powder is a common practice but ensure it’s of high quality. Poor powder can lead to clumps and moisture issues, impacting the print quality.
Optimal curing settings vary but generally range between 280-320°F for 150-180 seconds. Experimentation and calibration based on your specific setup are key to achieving the best results.

Ashley Wang is a skilled sales manager with knowledge in DTF printing. She presently works for ShenLan Digital, a reputable DTF printer maker. Ashley is the best person to offer advice on selecting the most suitable DTF printer because she has tested a lot of them. She launched DTFPrinterSchool to educate individuals and organizations about DTF printing technology, providing her expertise and observations on the most recent advancements in the sector. Ashley is an invaluable resource for businesses and individuals wishing to invest in DTF printing technology because of her expertise and experience in the industry.